Many people ask me how I draw on Adobe Illustrator? Well I am still very novice in the usage of the softwares, so I usually follow a tedious process, I know there are ways to do things more easily. But now I have got my hands apt at doing it this way. Thought of sharing it with you.
Here I am presenting the procedure I followed to digitize and color a simple sketch originally drawn by blue ball pen, in Adobe Illustrator. This is the original pen sketch, I sketched in my free time in my office.
Here I am presenting the procedure I followed to digitize and color a simple sketch originally drawn by blue ball pen, in Adobe Illustrator. This is the original pen sketch, I sketched in my free time in my office.

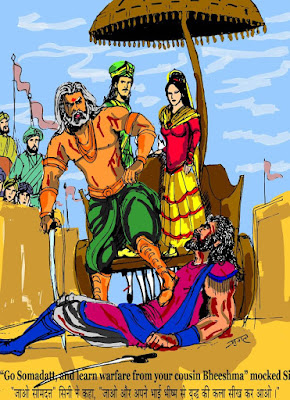
To tell you the story behind the sketch: There was a prince in Mahabharata named Vasudeva who was married to a royal maiden Devaki. The uncle of Vasudeva, Sini, pleased with the decision of Devaki to marry Vasudeva, placed both of them in his chariot. There was another warrior Somdatta who was competing for the hand of Devaki. He challenged Sini for a fight. Both of them fought and ultimately Somdatta was defeated, and Sini placed foot on his chest and thus disgraced him in public.
So I have drawn these four characters whom I'll color in Illsutrator such that the beauty of original sketch is not gone.
1. Import the original Sketch:Original sketch can be imported by scanning. I have simply clicked a pic of my sketch with digital camera and have copied it to my laptop. Now open Illustrator and import the sketch by going to File> Open. It looks like this.

2.Click on the pic using the cursor tool. You'll be able to see four tabs at the top. Out Of this you can click on two. They are Live Trace and Mask. There are lots of options in Live Trace. You can choose any of the presets. Each preset have a different setting for tracing. I have defined a new presets called Tracing Preset 2. I click on that.

3. These are the options of Tracing Preset 2. You can view this by clicking Tracing Options instead of selecting any presets.This is an important step. Look at the settings in this preset. The mode is black and white that means even if I have made my original sketch by blue ball pen, it will be visible with black outlies.By changing the threshold value you can change the areas of your original sketch to be ncluded in the tracing result. If you want more detailing then choose high threshold value. However, increrasing the threshold value also results in thick black lines in the tracing result. The most important setting is the Trace Setting, where I have chosen Fill and not Stroke. And I have chosen Ignore white option to let the white spaces as it is, so that i can color using brushes.

4. This is the tracing result. Ofcourse I am not happy with this as it have missed many details.

5. Now I have increased threshold value from 91 to 118. Now the sketch is almost fully visible though lines have become thick.

6.I have now made the Layer, Brushes and Color windows visible by going to Windows> Layer,Windows>Brushes.. You can see that the tracing result is on Layer 1.

7.For coloring I'll create another layer called Layer2 beneath Layer1. Here I'll do all the coloring.

8. By clicking on the folder like icon on the bottom left side of the Brushes window, I have imported Artistic > Artistic Calligraphic Brushes.

9. These are different types of Artistic Calligraphic Brushes. The number refers to the roundness of the brushes. The higher the number, the thicker would be the lines.By single clicking on desired brush sizes, I'll import them in the Brushes winow.

10.Clicking on the Strokes window gives the color Picker. It shows different shades. I have chosen one color which I'll use as skin color for Sini.

11. If you see I have chosen a brush with small roundness as I have to color in the face which require leaving out the portion of eyes, beard and mouth, so for careful coloring, I have zoomed the pic (Ctrl++). See the effect of Vectorized image that even when zoomed to 200 %, image doesnt look blurred.


12. Now I'll color using the graphic tablet and pen. you can see that since I am coloring on Layer2, it is not overwriting the traced lines.
This is the way I use graphic tablet
This is the way I use graphic tablet

13. Now color in Sini is almost over, and I have changed the brush sizes frequently while coloring. By using thin brushes and choosing dark colors, I have given shading as well

14. Similarly I will color in Somdatta's figure.

15. Now I have to color rest of the people in the sketch and I also want that the colors I have just done shud not be affected. For this, I will create another layer Layer3 beneath Layer2.

16. Here I will color the chariot and the figures of Devaki and Vasudeva.

17. Now to color rest of the sketch, the people in background and sky and ground, I will create yet another layer below Layer3. Its Layer4.
18.Now, oops I have forgetten that the fight between Sini and Somdatta is over so both of them should be bleeding. Now I cannot add the wound colors on them while I am working on Layer4. So I will go back to Layer2 and with a very narrow brush I will create blood marks on the bodies of Sini and Somdatta.

19. Now I have to add text to the image. For this I have to go to Layer1. And By clicking on "T" icon, I can enter the text. Here I have used "Baraha Direct" software to type in Hindi.

20. Now the pic is ready. I can now exprt it using File>Export and choosing the output format as JPEG. It will then ask for what quality image you want? Low, Medium, High ? All this has to do with the resolution. I choose medium quality as High quality JPEG takes a lot of time to export and lot of space in memory also.
The output pic looks like this.
Another way is not to use Tracing option at all. Use instead the original sketch as a template layer and manually trace the outlines using a brush. This is more common and popular method. An exmple of the same:


The output pic looks like this.

Another way is not to use Tracing option at all. Use instead the original sketch as a template layer and manually trace the outlines using a brush. This is more common and popular method. An exmple of the same:


2 comments:
*AWESOME!!*
How did you manage to learn all this?
Beautiful sketch, as always done to perfection.
Post a Comment